 |
 |
MLPI-MotionLogicProgrammingInterface(mlpi4Java)
1.26.2
|
Starting at version 1.17.0.0 MLPI SDK supports two different communication protocols that can be used either to perform a secure (MLPIS) or insecure communication (MLPI) with the target device. MLPIS is only supported by devices Wind River VxWorks release 6.9 (i.e. MLC CMLC75, XLC CML75 and MLC XM2) with firmware version MLC 14V18 and newer.
Secure communication (i.e. MLPIS) refers to the encryption of the communication with the target device, thus protecting the exchanged information across the network. In the case of insecure communication (i.e. MLPI) the communication with the target device is not encrypted, therefore, it can be easily read or manipulated if the network traffic were to be analyzed (for example: using Wireshark). It is highly recommended to use secure communication in order to enable secure connections. This is done by using the '-tls=active' option in the connect function . For more information see ApiLibConnect.
MLPI employs the TCP/IP protocol. TCP is the most widely known and used connection-oriented protocol due to its high reliability that ensures that all information sent from a source is received on the target.
The information sent through this protocol is seen in the same format as it was sent by the source. Therefore, its use is recommended in cases where the security of the network is already ensured or in cases when data confidentiality is not required.
The MLPI SDK supports a second communication protocol: TLS. TLS is a cryptographic protocol that provides data confidentiality, integrity and client-server authentication. To implement this protocol both client and server must each have a private key and a certificate. The certificate contains the public key and additional information that allows to authenticate the owner of the private key. Unlike in TCP where we use the term connection to describe the established communication, in TLS the term session is used to refer to both the connection established between client and server and the information used to secure such communication.
The steps performed between client and server to perform a TLS connection establishment can be seen in the following image.
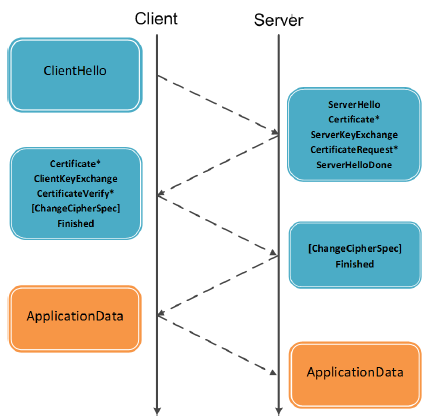
As seen above, both client and server exchange their certificates to be able to communicate with one another. The certificates are exchanged in order to authenticate the owner of the private key and in order to exchange the public key that is used to encrypt the session negotiation information. Once the session negotiation has been completed, a unique session key is generated that both client and server will use throughout the whole life-cycle of the session, thus ensuring long-standing security. It must be noted that in order to ensure the security of the communication the private key must always be kept secret and it is recommended to have only one private key per client/server.
The secure credentials required to implement secure communication in MLPIS can be generated using the OpenSSL toolkit. This toolkit provides an open-source implementation of the SSL and TLS protocols and provides many more cryptographic operations (e.g. generate certificates, private and public keys, etc.). The OpenSSL Software Foundation provides the sources that can be compiled and installed. Once the installation has been completed the following steps need to be followed in order to generate the security credentials (i.e. private key and certificate).
The first element that must be generated is the private key, as all the additional elements (Certificate Signing Request and Certificate) are generated from it.The genpkey command is used to generate private keys with the specified configuration:
| [in] | cryptAlgorithm | Encryption algorithm: RSA or DSA. |
| [in] | privKeyFileName | Name of the file where the private key will be stored. |
| [in] | privKeyFileFormat | File format of the key: PEM (Base64 encoding) or DER (binary). If not specified, the PEM format is used by default. |
| [in] | privKeyPwd | Password used to protect the confidentiality and integrity of the private key. |
| [in] | cipherName | Cipher algorithm used to encrypt the private key (e.g. des, des3, rc4, etc.). |
| [in] | optionName:optionValue | Additional key generation options. For both RSA and DSA the length of the private key in bits can be defined using the rsa_keygen_bits and dsa_paramgen_prime_len options respectively (e.g. rsa_keygen_bits:2048). If not specified, the length 1024 is used by default. Additionally, RSA allows to specify the public key exponent in its decimal or hexadecimal representation using the rsa_keygen_pubexp option (e.g. rsa_keygen_pubexp:65537). |
It is also possible to generate a file with the genpkey command that contains all the configuration arguments for the generation of the private key. This is mandatory to generate a DSA private key. Additionally, it can be useful when generating multiple keys with the same configuration parameters.
The syntax to generate the configuration file is the following:
| [in] | configFileName | Name of the file that will contain the configuration arguments to be used in order to generate the private key. |
| [in] | configFileFormat | File format of the configuration file (DER or PEM). |
After the configuration file has been created, it can be used to generate the private key with the genpkey command. The private key generated will have the settings defined in the configuration file.
| [in] | configFileName | Name of the file contains the configuration arguments to be used in order to generate the private key. |
| [in] | keyFileName | Name of the file where the private key will be stored. |
After the private key has been generated, the CSR must be created. The CSR contains the public key and organizational information that will be added to the certificate such as the company name, its location, etc. The CSR is most commonly provided to a Certificate Authority (CA) in order to request a certificate. However, it is also required in cases where no specified CA is defined and self-signed certificates are desired.
The req command is used to generate CSRs, self-signed certificates and it can also generate private keys. To generate a certificate first a CSR needs to be created.
| [in] | digestName | Message digest used to sign the CSR (e.g. -sha256). To obtain a full list of the supported digest names, run the following command: openssl –digest-commands. |
| [in] | privKeyFormat | Format of the private key (PEM or DER). If not specified, the PEM format is used by default. |
| [in] | privKeyName | File name of the private key from which the public key will be extracted in order to generate the CSR. |
| [in] | privKeyPwd | Password required to extract the public key from the encrypted private key (only needed if the key is encrypted). |
| [in] | csrFormat | File format of the CSR to be generated (PEM or DER)). If not specified, the PEM format is used by default. |
| [in] | csrName | Name of the file where the CSR will be stored. |
| [in] | csrPwd | Password used to protect the confidentiality and integrity of the CSR. |
After these commands are executed, the following information is requested: country name (2 letter code), state or province name, locality name, organization name, organizational unit name, common name, email address, challenge password (which should not be configured for certificates for the target device) and optional company name.
Once a CSR has been generated, a different syntax for the req command is used in order to generate a certificate.
| [in] | csrFormat | Message digest used to sign the CSR (e.g. -sha256). To obtain a full list of the supported digest names, run the following command: openssl –digest-commands. |
| [in] | csrName | Format of the private key (PEM or DER). If not specified, the PEM format is used by default. |
| [in] | csrPwd | File name of the private key from which the public key will be extracted in order to generate the CSR. |
| [in] | certFormat | Password required to extract the public key from the encrypted private key (only needed if the key is encrypted). |
| [in] | certName | File format of the CSR to be generated (PEM or DER)). If not specified, the PEM format is used by default. |
| [in] | daysNumber | Name of the file where the CSR will be stored. |
| [in] | serialNumber | Password used to protect the confidentiality and integrity of the CSR. |
An overview of additional command line utilities provided by Openssl are available in https://wiki.openssl.org/index.php/Command_Line_Utilities.
The MLPI has the possibility of user-specific account management based on the function layer, meaning a user account has a fixed set of permissions that allow it to execute only a fixed scope of MLPI functions on the control. The relation between the user accounts and their permissions are managed by a set of XML manifest files located on the control. The structure and organization of these files has varied in the last MLPI Versions and hence, special attention must be taken in case it is desired to modify such files manually.
All functions of the MLPI are bundled within functional groups, where each group is assigned to one explicit permission.
| functional group A | permission |
|---|---|
| mlpiLogicGetStateOfApplication | MLPI_LOGICLIB_PERMISSION_APPLICATION_INFO |
| mlpiLogicGetOperationStateOfApplication | |
| mlpiLogicGetTaskInfoOfApplication | |
| mlpiLogicGetInfoOfApplication | |
| functional group B | permission |
| mlpiLogicSaveRetainOfApplication | MLPI_LOGICLIB_PERMISSION_RETAIN_DATA |
| mlpiLogicRestoreRetainOfApplication | |
| functional group C | permission |
| ... | ... |
When establishing the connection by calling mlpiApiConnect, the user account itself and the maximum number of logins of this user account will be checked by the system. Therefore, you have to give the username and the password of your desired account through the mlpiApiConnect function to the system. In case of a successful validation, you will get the corresponding permissions of this account for the complete session of this connection. If the maximum limit of logged in users of this account is reached, the function mlpiApiConnect will return with the error MLPI_E_LIMIT_MAX. In case the user is unknown, the function mlpiApiConnect will return with the error MLPI_E_PERMISSION. Furthermore, in case the user is not the owner of a permission of a functional group, he will get the error MLPI_E_PERMISSION on the invalid call of a function of this group.
A connection can be closed by an other connection with the assistance of the functions mlpiApiCloseConnectionByUid, mlpiApiCloseConnectionsByUser or mlpiApiCloseConnectionsByUri to protect dead locks caused by reaching the maximum number of concurrent logins. To prevent the closing of your connection by an other connection, use the attribute protection within your user account (accounts.xml) or use the same named option within your connection string of the function mlpiApiConnect (see MlpiApiProtection). If a connection runs in protected mode, the functions mlpiApiCloseConnectionByUid, mlpiApiCloseConnectionsByUser or mlpiApiCloseConnectionsByUri return the error MLPI_E_RD_WR_PROTECTION on call.
The user accounts, their attributes and the associated permission sets are defined in manifest files. In server versions lower than 1.20.0.0 the name of this manifest is accounts.xml. Whereas in server versions 1.20.0.0 - 1.26.0.0 the name of this manifest is users.xml. Starting in server version 1.26.0.0 the users and permissions are divided in two different manifest files named users.xml and groupsV2.xml.
accounts.xml) manages not only the access to specific MLPI libraries, but also to the following communication protocols: FTP, SFTP and SSH. Any user specified in the account manifest can connect to the target control with these protocols using valid credentials (i.e. username and password) defined in the manifest. groupsV2.xml) located on the OEM partition (MLPI_PATH_PROJECTDATA). Information about the users, as well as their group memberships is found in the new user manifest file (i.e. users.xml) also located on the OEM partition. This new user manifest file replaces the deprecated user manifest (i.e. accounts.xml). The MLPI Library AccessControlLib provides the functionality to create and manage users and groups, as well as to assign their corresponding memberships and permissions.The default user (Version 4) and group (Version 2) manifests are located at the root of the Project Data folder located in the OEM partition(MLPI_PATH_PROJECTDATA) of the control for server versions 1.26.0.0 or higher. Older Manifest versions can be ported to their newer version by placing them in this directory and rebooting the system after deleting any preexisting manifest (i.e. users.xml and groups.xml). It is important to highlight that a firmware version 14V22 or higher must be installed in the control in order to successfully perform the version update of the manifest files.
Unlike in older MLPI Server Versions, the OEM partition is the only valid location for manifest files. This has been modified in order to comply with the new user and permission management supported by the MLPI library AccessControlLib. The manifest in the SYSTEM partition (MLPI_PATH_SYSTEM) defines the default users when the factory settings are loaded. Please do not modify the SYSTEM user and group manifests!
Additionally, the manual creation of a user (for example directly modifying the user manifest file located on the target control using FTP) is highly discouraged and it is recommended to add and manage new users and groups using the methods provided by the MLPI Library AccessControlLib.
The following steps should be carried out in order to create a completely new and usable user and group:
We have default group called "engineer". This group contains the necessary permissions required by the user indraworks. It is not recommended to do changes or delete this group. In order to add a user into a group, the method mlpiAccessControlAddUserToGroup must be used. By following these steps, the manual manipulation of the manifest file and the reboot of the control are not necessary.
The default manifest is located at the root of the Project Data folder located in the OEM partition(MLPI_PATH_PROJECTDATA) of the control and now has the version 3. Older Manifests (i.e. Version 2) can be ported to the newer version (i.e. Version 3) by placing them in this directory and rebooting the system. Unlike in older MLPI Server Versions, this manifest file is the only one that is located in the control. This has been modified in order to comply with the new user management supported by the MLPI library AccessControlLib. The manifest in the SYSTEM partition (MLPI_PATH_SYSTEM) defines the default users when the factory settings are loaded. Please do not modify the SYSTEM account manifest!
Additionally, the creation of a manual user is highly discouraged and it is recommended to add new users to the manifest file by using the methods provided by the AccessControlLib. Although it must be noted that the new users added with this library will contain no MLPI Permissions and hence, the permissions must be added by manually modifying the manifest file (see Manifest for server versions before 1.19.0.0) after the user has been added. Afterwards, the control must be rebooted in order for the changes to be applied or you can use just use the function mlpiApiUserAccountControlReload. If you still want to add the user manually you can do it in the same way like in the old versions (Manifest for server versions before 1.19.0.0), but you have to ensure that the id of the user is unique and you always have to update the lastID item to the last used user id:
A default group called "engineer" is handled by the user management. This group contains the necessary permissions required by the user indraworks. It allows to provide the same MLPI Permissions as those defined for the indraworks user to all the users that are assigned to it. In order to add a user into a group, the method mlpiAccessControlAddUserToGroup must be used. By following these steps, the manual manipulation of the manifest file and the reboot of the control are not necessary.
This default group also allows to remove the indraworks user and add new users with different login credentials for their use in indraworks (since Indraworks-Version 14V20).
The MLPI SDK provides a template of the manifest accounts.xml in the folder "..\%MLPI-SDK%\data\...". The template contains a factory preset of user accounts and permissions, which have to be adapted and placed on the OEM partition by the system integrator. The adaption of the account manifest accounts.xml will be supported by the XML scheme file accounts.xsd, which is located at the same place. It's recommended to use it to simplify editing and to verify the contents of your account configuration.
The functional groups and the according permissions are documented within the chapter "Version and Permission" of the regarding library documentation (e.g. "LogicLib": LogicLibVersionPermission). The function groups of a library can be enabled at once by using the library-global permission key "MLPI_*LIB_PERMISSION_ALL".
Each functional group can be selectively picked by deactivation or deleting of the library-global permission key "MLPI_*LIB_PERMISSION_ALL" and using a list of the desired permission keys. You can also switch off single permissions by using enabled "MLPI_*LIB_PERMISSION_ALL" and followed by disabled single permission keys.
You can specify the password for an account either in plain text by using the attribute password or by using a hash value with the attribute hash. It is highly recommended to use the hash value and not the plain password approach. The latter is only helpful for debugging purposes. You can generate hashes from passwords by using the program hashmaker.exe in the folder "..\%MLPI-SDK%\data\" of the MLPI-SDK, the linked local HTML site at the MLPI SDK overview site (section "Hash calculator") or any other Whirlpool hashing tool.
For example, use the command line tool to generate a hash value for the password "gothamcity".
Now copy the resulting hash value to the manifest accounts.xml.
hashmaker.exe copies the resulting hash value to the clipboard, so you do not need to type it to the accounts.xml manually.The account of the user "batman" is now secured by the password "gothamcity". See mlpiApiConnect for login details.
The default manifest is located at the root of the SYSTEM partition (MLPI_PATH_SYSTEM) of the control. As a backup, this manifest should be left untouched without any modification. The system integrator has the possibility to place a second adapted manifest accounts.xml at the root of the OEM partition (13VRS, MLPI_PATH_OEM) resp. at the root of the project data folder (14VRS, MLPI_PATH_PROJECTDATA) of the control. During booting or reloading, the control will search for the manifest on this location at first and at second on the SYSTEM partition.
Since version 1.4.0.0, the MLPI server on the control supports the merge of account manifests. To activate the merge of a manifest, you have to use the XML attribute merge followed by the XML attribute value add or replace in your manifest within the XML node accounts. This feature makes it possible to easily add new accounts through a new accounts.xml on OEM partition (MLPI_PATH_OEM) without taking care of the accounts of the delivered system accounts on the SYSTEM partition (MLPI_PATH_SYSTEM).
accounts.xml (generally loaded from OEM partition (MLPI_PATH_OEM) or, at second, from SYSTEM partition (MLPI_PATH_SYSTEM)) defines the default merge operation for all further account manifests, which didn't do this by itself through separately using the XML attribute merge.| Merge operation | Description |
|---|---|
| add | The MLPI server tries to add the accounts of the manifest to the user account control (UAC). If an account is already present, this new account will be ignored. |
| replace | The MLPI server tries to add the accounts of the manifest to the UAC. If an account is already present, this old account will be replaced by the new one. |
| n/a | The MLPI server use the preset of the first loaded account manifest generally loaded from OEM partition (MLPI_PATH_OEM) or, at second, from SYSTEM partition (MLPI_PATH_SYSTEM). |
"accounts.xml" located at the root of the SYSTEM partition (MLPI_PATH_SYSTEM) does not use the XML attribute merge so the system integrator has the possibility to define its default behavior by using the XML attribute merge within the manifest "accounts.xml" located at the root of the OEM partition (MLPI_PATH_OEM).Furthermore, the MLPI supports the additional loading and unloading of user-defined account manifests by using mlpiApiUserAccountControlLoadAccounts and mlpiApiUserAccountControlUnloadAccounts after the automatic loading of the account manifests accounts.xml from the OEM partition (at first) and the SYSTEM partition (at second).

