 |
 |
MLPI-MotionLogicProgrammingInterface(mlpiCore)
1.26.2
|
It is possible to place the executable of a Workbench project on a XLC or MLC device as a 'bundle'. This way, the executable will be automatically loaded and executed during startup of the control. Using this bundle mechanism, you can deploy your application together with the rest of your project or as an extension of the already installed control functionality. In terms of 'bundle', you can think of a 'plugin' or 'package' which extends the functionality of the automation controller. Other than memory or performance, there is no limit on how much bundles can be placed on the control.
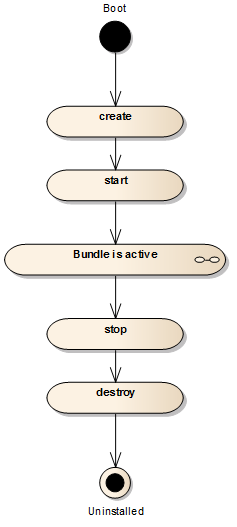
To write a bundle, you have to provide an activator with several entry points which are executed in different states during startup and shutdown of the control. Furthermore, you need to set some meta informations of the bundle from within your bundle. These include information such as name, description and vendor of the bundle. This part is called the "activator" of your bundle.
The following entry points are necessary in the activator:
create(): This functions gets called first. It is recommended to allocate all necessary resources during this step. For example, all memory allocations or the creation of suspended tasks. It is not allowed to start any tasks during this step, because the rest of the system has not finished booting and is still in an uninitialized state. If you want to provide PLC functions or function blocks from your bundle to be usable in the PLC system, as described in the section Extension of PLC functions by C/C++ implementation, then you must register the functions in this step. This is because the PLC boot application gets loaded between onCreate and onStart of all bundles and all necessary functions and function blocks need to be registered at this time. A negative return value of this function indicates an error and the bundle will not be started by the system.start(): After successfully creating all bundles and loading the PLC boot application, the onStart event is send to all bundles. This is the right time to spawn tasks and start your application logic. A negative return value of this function indicates an error and the bundle will not be destroyed by the system.stop(): This function gets called, when the bundle is about to get unloaded. Stop all your tasks and quit operation. Please note, that this event won't be send when powering off the control using the main power switch or reboot.destroy(): This is the last step before the bundle gets unloaded from memory. It is crucial to release all resources and memory in here to prevent memory leaks.Here is an image showing the different activation steps.
Other than the loading and unloading entry points, the activator must also provide an entry point for bundle meta data such as like name, vendor or version. Please use the provided macro functions to create the correct entry point. An example is shown below:
BUNDLE_INFO_BEGIN: The symbolic name of your bundle in C notation. This name has to be unique and is only allowed to contain letters, numbers and underscores. This name has to match with the prefix of the other entry functions as well as the path and bundle name on the file system. The symbolic name uniquely identifies your bundle in the system. Therefore, it is common convention to begin with the reverse Internet domain of your company or institution. The name of the bundle is next, but you may also insert additional names to structure your plugin layout and to prevent name collisions. For example: com_example_region_department_bundlename. The symbolic name in non-C notation uses fullstops instead of underscores. So the symbolic name of our example is: com.boschrexroth.energyMonitor.BUNDLE_INFO_NAME: A descriptive short name of the bundle.BUNDLE_INFO_VENDOR: Your vendor name for the bundle.BUNDLE_INFO_DESCRIPTION: A short description of the purpose of the bundle.BUNDLE_INFO_VERSION: The bundle version information (major, minor, bugfix, patch) and an additional custom version string.So a fully working example of an activator for our example would look like the following code. Note, that the prefix of the entry points matches to the symbolic name in C notation.
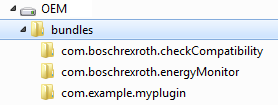
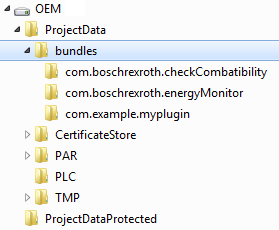
For your bundle to be loaded and started during startup of the control, you have to compile and copy the executable to the data storage of the target device. Usually, your target device has at least 3 partitions, a SYSTEM partition, an OEM partition and an USER partition (MlpiSpecialPath). The absolute, native paths of these partitions depends on the target itself, e.g. on an IndraMotion XLC CML45 the absolute path of the OEM partition is called "/ata0a/". Different FTP clients shows the absolute paths itself (Filezilla, e.g. "/ata0a/") or the logical paths (IndraWorks, e.g. "OEM"). The SYSTEM partition is for Bosch Rexroth bundles which are exclusively part of the firmware package. On the OEM partition, there is an additional folder bundles (13VRS) resp. ProjectData/bundles (14VRS) where you can place all bundles for your automation controller.
| 13VRS | 14VRS |
|---|---|
| 
|
bundles (13VRS) resp. ProjectData/bundles (14VRS) on OEM by yourself if it's not yet available there.Create a new folder within the bundles (13VRS) resp. ProjectData/bundles (14VRS) folder for your bundle and place the compiled executable of your bundle into it. Folder name and name of the executable have to be the same. Both names have to be the symbolic name of your bundle.
Here a few things to check if your bundle didn't get loaded during startup of the control:
Mlpi Trace Viewer (Using the Trace for debugging) as part of the COM examples to list all loaded bundles and their current state.MLPI. There are detailed trace messages about the bundle loading mechanism.
