 |
 |
MLPI-MotionLogicProgrammingInterface(mlpiCore)
1.26.2
|
We therefore recommend using Microsoft Visual Studio 2010 for MLPI application development on the windows platform; using the Express version is also approved. You can download the Express version under http://www.microsoft.com/visualstudio/en-us/products/2010-editions/visual-cpp-express
Learn how to set up a simple Microsoft Visual Studio 2010 Express project which runs on a standard windows platform and is able to connect to an MLPI device using MLPI function calls. All MLPI function calls are tunneled through TCP/IP over an Ethernet connection to the control. Please keep in mind that hard real-time from your application to the control is not possible using this setup.
Start Visual Studio 2010 Express and create a new project: ( From Menu: File->New->Project ).
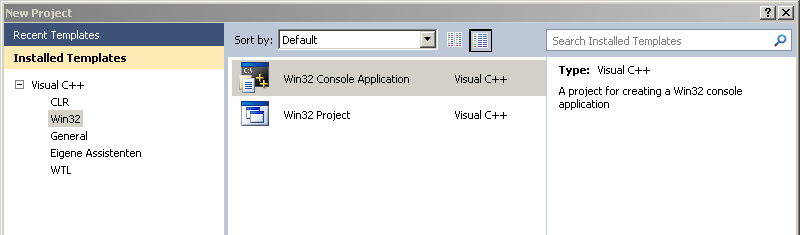
On the left side, please select Win32 and start using a simple 'Win32 Console Application'.
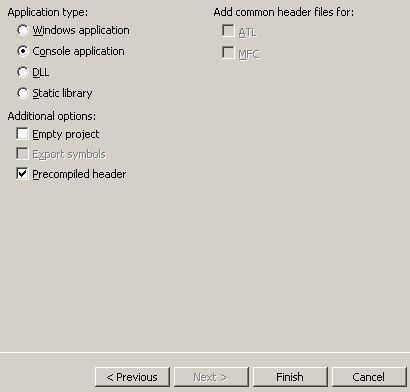
Finish the project wizard by clicking 'Finish'.
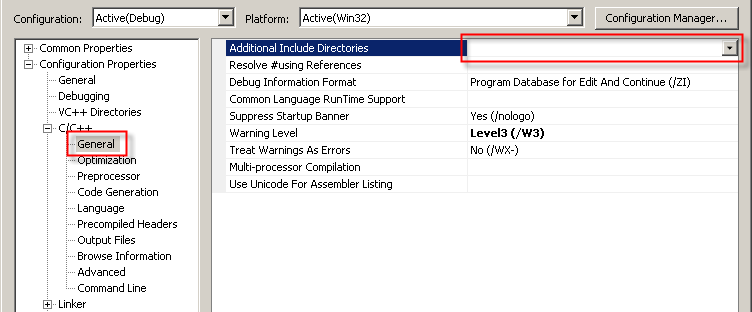
Since it is not possible to add the library path as default in the Express version, you have to set it individually for every new project. To do this, you have to right-click the project root in the solution explorer and choose properties. You can find the "Additional Include Directories" under Configuration Properties->C/C++->General. Add the path to your <install>\include directory. You have to perform this step for Configuration->Release too!
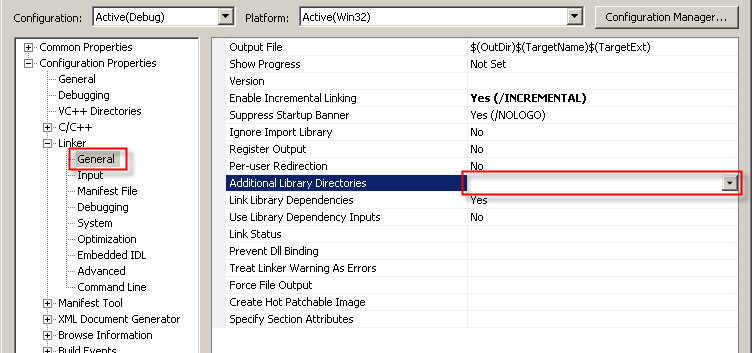
The "Additional Library Directories" can be found under Configuration Properties->Linker->General. Here, you should add the path to your library file located in the installation directory. The static library is found in the <install>\lib directory, whereas the shared library is located in the <install>\lib directory. The specification of the directory containing the library file must also be done for the Configuration->Release.
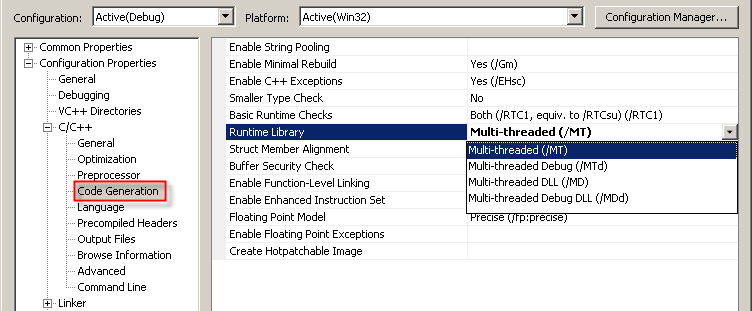
As an additional step, you have to change the link options for the runtime libraries from dynamic linking(/MD) to static linking(/MT). You can change this in the project options ( From Menu: Project->Properties). Then go to Configuration Properties->C/C++->Code Generation->Runtime Library and select Multi-threaded (/MT).
dllmlpiwin32.dll. To do this, you have to link against "dllmlpiwin32.lib" and need to deploy the file dllmlpiwin32.dll. together with your application. It can be found in the SDK directory under <install>\mlpiCoreClient\bin\.... This might be necessary if you get linker conflicts with other static libraries your application might depend on. Or if you want to use a newer version of Visual Studio.You now have an empty Win32 project and may want to start developing with the MLPI-API library.
You therefore have to include the MLPI library as well as the needed MLPI headers.
Build your project by selecting Debug->Build Solution from the Visual Studio menu.
To start your project, select Debug->Start Debugging or press F5. Your application should start running and you should see the name and firmware version of your device.

